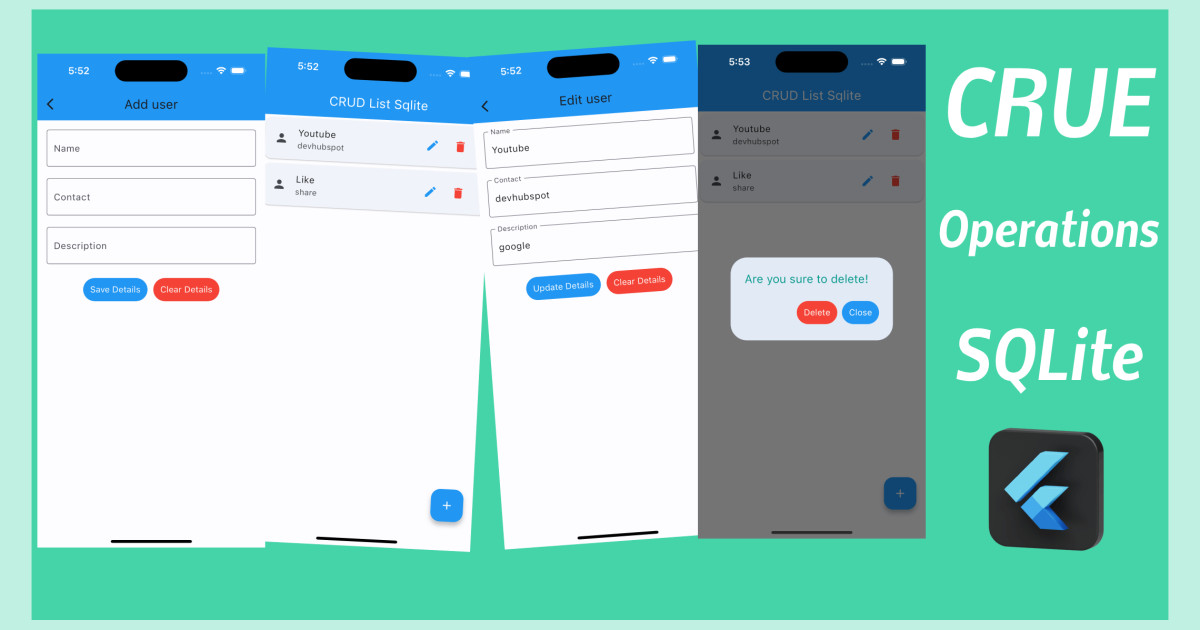
Flutter: Create Timeline Event Home Page UI
Flutter
UI
home
event
timelineview
timeline
In this blog, We will design a simple event home page ui with timeline view and search bar.
Start by creating a new Flutter project in either of VS Code or Android Studio. Replace the Flutter default counter application in main.dart with your own stateful widget.
You should have something like this:
import 'package:flutter/material.dart';
import 'package:timelineview/pages/home.dart';

void main() {
  runApp(const MyApp());
}

class MyApp extends StatelessWidget {
  const MyApp({super.key});

  // This widget is the root of your application.
  @override
  Widget build(BuildContext context) {
    return MaterialApp(
      title: 'Flutter Demo',
      theme: ThemeData(
        primarySwatch: Colors.blue,
      ),
      home: Home(),
    );
  }
}
Before Create Home stateful widget create home.dart file in home folder, then inside of it with the following code:
import 'package:flutter/material.dart';

class Home extends StatefulWidget {
  const Home({super.key});

  @override
  State<Home> createState() => _HomeState();
}

class _HomeState extends State<Home> {
  @override
  Widget build(BuildContext context) {
    return Scaffold(
      backgroundColor: Colors.grey[100],
        appBar: AppBar(
          backgroundColor: Colors.pinkAccent,
          elevation: 0,
          leading: Icon(Icons.menu, color: Colors.white),
          actions: [
            Padding(
              padding: EdgeInsets.all(10.0),
              child: Container(
                width: 35,
                height: 35,
                decoration: BoxDecoration(
                  borderRadius: BorderRadius.circular(10),
                  image: DecorationImage(image: AssetImage('assets/t.jpg'), fit: BoxFit.cover)
                ),
                child: Transform.translate(
                  offset: Offset(10, -10),
                  child: Container(
                    margin: EdgeInsets.all(10),
                    decoration: BoxDecoration(
                      border: Border.all(width: 3, color: Colors.white),
                      shape: BoxShape.circle,
                      color: Colors.yellow[800]
                    ),
                  ),
                ),
              ),
            )
          ],
        ),
        body: SafeArea(

          child: Padding(padding: EdgeInsets.only(left: 20.0, right: 20.0),
              child: SingleChildScrollView(
               child: Column(
              crossAxisAlignment: CrossAxisAlignment.start,
              children: <Widget>[
                  Padding(padding: EdgeInsets.all(15.0),
                  child: Container(
                    // padding: EdgeInsets.symmetric(vertical: 5),
                    decoration: BoxDecoration(
                      borderRadius: BorderRadius.circular(50),
                      color: Colors.white
                    ),
                    child: TextField(
                        decoration: InputDecoration(
                          border: InputBorder.none,
                          prefixIcon: Icon(Icons.search, color:Colors.grey),
                          hintText: "Search Event",
                          hintStyle: TextStyle(color: Colors.grey)
                        ),
                    ),
                  ),
                  ),
                  SizedBox(height: 30),
                  makeItem(image:'assets/t.jpg', date:18),
                  SizedBox(height: 30),
                  makeItem(image:'assets/t.jpg', date:19),
                  SizedBox(height: 30),
                  makeItem(image:'assets/t.jpg', date:20),
                  SizedBox(height: 30),
                  makeItem(image:'assets/t.jpg', date:21),
                  SizedBox(height: 30),
                  makeItem(image:'assets/t.jpg', date:22),
              ],
            ),
          ),

          ),
        ),
    );
  }


  Widget makeItem({image, date}){
    return Row(
      children: [
        Container(
          width: 50,
          height: 200,
          margin: EdgeInsets.only(right: 20),
          child: Padding(
            padding: EdgeInsets.only(top: 10),
            child: Column(
              children: [
                Text(date.toString(), style: TextStyle(color: Colors.pinkAccent, fontSize: 25, fontWeight: FontWeight.bold)),
                Text('JAN', style: TextStyle(color: Colors.black, fontSize: 18, fontWeight: FontWeight.bold))
              ],
            ),
          ),
        ),
        Expanded(
          child: Container(
            height: 200,
            decoration: BoxDecoration(
              borderRadius: BorderRadius.circular(20),
              image: DecorationImage(
                image: AssetImage(image),
                fit: BoxFit.cover
              )
            ),
            child: Container(
              padding: EdgeInsets.all(20),
              decoration: BoxDecoration(
                borderRadius: BorderRadius.circular(20),
                gradient: LinearGradient(
                  colors: [Colors.black.withOpacity(0.4), Colors.black.withOpacity(0.1 )]
                )
              ),
              child: Column(
                crossAxisAlignment: CrossAxisAlignment.start,
                mainAxisAlignment: MainAxisAlignment.end,
                children: [
                  Text("DevhubSpot Event", style: TextStyle(color: Colors.white, fontSize: 25, fontWeight: FontWeight.bold)),
                  SizedBox(height: 10),
                  Row(
                    children: [
                      Icon(Icons.access_time, color: Colors.white),
                      SizedBox(width: 10,),
                      Text("7:00 PM", style: TextStyle(color: Colors.white))
                    ],
                  )
                ],
              ),
            ),
          ),
        )
      ],
    );
  }
}
Output:

Flutter
UI
home
event
timelineview
timeline